How Do I Stop Buffering?

How Do I Stop Buffering?

How to improve TV streaming and picture quality on NUMedia

Watch These

Awesome Videos

Fire Stick Features, Settings & Tips


Faster & Better Internet

>Don’t suffer through annoying pauses or blurry, low resolution. Here’s how to get better streaming from your smart TV using your Amazon Fire Stick on NUmedia

Few things are more annoying than a hard break while the NUmedia app buffers and loads during your latest binge.

If you’ve suffered through slow loading, playback pauses and low resolution while streaming Netflix, Amazon Video, Hulu or MuMedia, it’s not necessarily the service’s fault. It could be your internet connection. There are also several default settings on your Fire Stick that consume a lot of resources which you can change to significantly improve performance.

Fortunately, there are  also some steps you can take to improve the connection on your TV, streaming device or game console. For the most part, the faster the Internet, the better your streaming quality.

If you are experiencing any buffering or temporary loss of picture quality with NUmedia please follow these steps;

Contact NUmedia Tech Support  by clicking on the chat button in the bottom right corner of www.7uptv.com/support   or texting them at SMS Text Support (808) 333-3706.  Let support know the steps you have already taken.  They may ask you to uninstall the 7UPTV App and download an updated version, or clear the cache on your Fire Stick.  Below is a short Script  that will walk you through  uninstalling and reinstalling to make sure you have the latest version:

1. Before you get started be sure to write down your 7UPTV Media username and psw

2. go to settings / FireTV
/ Developer options turn on apps from unknown sources

3. Go to applications 7UPTV and uninstall the current version

4. Launch downloader Go to Files, and delete  any existing 7UPTV downloads and any other extra install files

5. Go to home in the Down loader, and enter the url
http://7uptv.com/us.apk

6. Download the us.apk file then delete it after you install it . Otherwise it simply takes up space unnecessarily on your Fire stick.

7. Press Home, go to settings, go to FireTV, Go to Developer Options, turn off Install apps from unknown sources

8. Press Home, navigate to the end of the apps and channels row, use the menu button (the button with 3 lines to the right of the home button – the house) to move the 7uptvusa app “to the front” of the “Your Apps and Channels” row.

8. Launch the 7uptvusa App

9. Enter your username and password

10. Use the app settings, the gear in the upper right corner to change the time format from 24 to 12 hour.

11. Make any other appropriate settings changes.

12. Start watching and enjoying!

13.Begin by searching ALL for your favorite channels and saving them as favorites!

14. AT YOUR LEISURE, To improve RESISTANCE TO BUFFERING FOLLOW THE STEPS IN THIS VIDEO
https://globalpartnerssite.com/how-do-i-stop-buffering/#watch

If you are Installing Numedia for the Very 1st Time Please Follow these Directions: https://7uptv.com/install.pdf

Your 7UPTV USA account allows you to download and play 7UPTV media on 4 devices at the same time (from no more than 2 IP addresses) including:

  • Amazon Fire TV Sticks

  • Android Tables & Cell phones

  • Windows & Apple Computers

  • Web Player from any internet connected device

If you find your speed to be low, here’s some options to consider:

1. Upgrade your internet speed

This is certainly the most obvious, but when was the last time you asked your providers about how fast their offerings are now? If it’s been a few years, they likely have new services (maybe even fiber optic -the fastest) that could greatly increase your download speeds.

You need at least 15Mbps for 4K streaming, but really, you want a lot more than that. It’s also possible there are new providers or services from other companies. When I moved into my house, the phone company had the best option, a pretty fast DSL line that was way better than the local cable provider. Now, said cable company has 6 times the speed at 60 percent of the price. I was able to save money and increase my internet speed quite dramatically.

This is the first place to start.

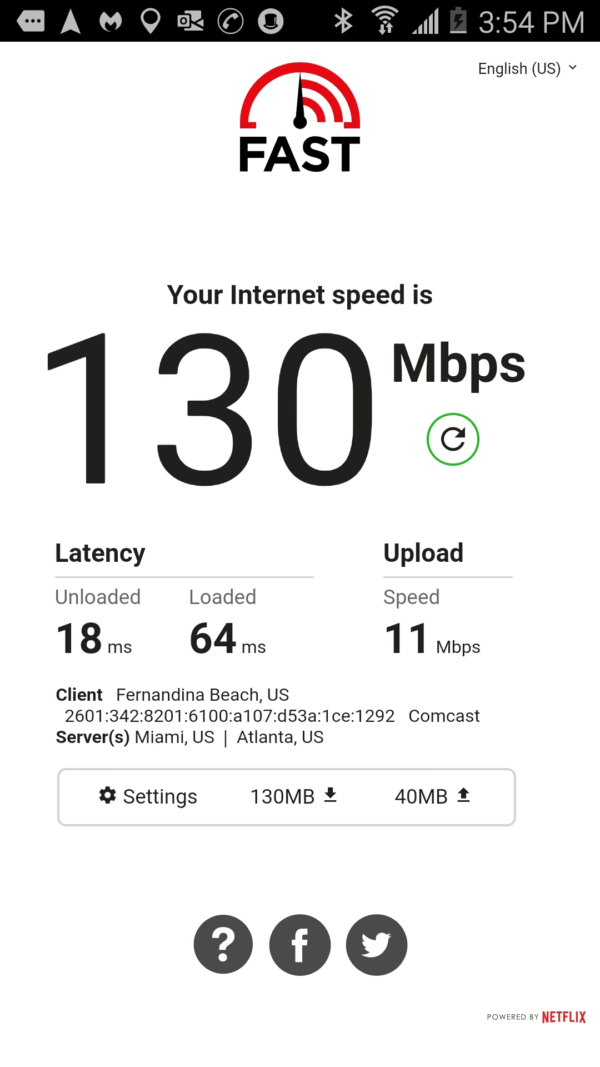
I was paying $60.00/month with a national provider  for their  “Internet 75” 75 mbps (million bits per second). However even when running their  speed test I never saw more than 30mbps, and usually it was 20 to 25mbps (even though I was paying for 75!) . So step 1 is to check and see if you are actually getting the speed you are paying for. I switched to another providers internet only package with 150mbps service for $59/mo and now get 130mbps even on my phone! This eliminated 99.9% of all buffering.  Below is a screen shot of the speed test on my phone connected to the new Wifi service. This is representative of what the Fire stick in my Samsung Smart TV sees when streaming through the 7UPTV app.

2. Upgrade your router/hub

The Wi-Fi router that you get for free from your Internet provider is likely terrible.  Think about it.  They give out hundreds of these every month and are not going to give you that better device if it’s going to cost them more money.  They’ll give you the minimal viable product.

I thought I was having problems with 7UPTV when that wasn’t the case.  The first problem I solved was that I upgraded my router.  I instantly noticed a significant improvement.

Keep in mind that some providers even charge monthly for these lower quality routers, so you could save some money long-term by buying a good one outright and reducing your bill a bit each month.

Internet providers usually charge you a monthly rental fee for modems. I saved $55/month in rental cost by purchasing my own modem from Amazon for a one time cost of $159.

“MAKE SURE THE MODEM/CABLE ROUTER  YOU BUY IS COMPATIBLE WITH YOUR INTERNET SERVICE. YOUR INTERNET SERVICE PROVIDER CAN HELP CONFIRM THIS. THEY WANT TO KEEP YOU AS A CUSTOMER EVEN IF IT IS JUST FOR THE INTERNET”

You’ll also likely get better range and better signal throughout your home with an upgraded  router. So if you’ve always had a bad connection in the back of the house (or wherever), a better router might help that.

A new or different router might also give you the option to connect via the 5GHz range (“normal” Wi-Fi is 2.4GHz). 5GHz is generally faster and has less chance of interference from other devices. However, it doesn’t go through walls as well.

3. Switch to Ethernet

Though convenient, Wi-Fi can be quite slow. Ethernet (wired internet) is a lot faster and doesn’t have issues with walls, interference or distance (well, not in a house anyway). Though running wires can be annoying, it provides the most reliable connection.  The second problem I ran into in my own home was that I had what my friend who was an owner of a local Internet Service Provider called the “wall of death”  What he meant by that was that I had one wall in my home that was especially difficult for the wifi signal to get through.  Usually that occurs when there’s too much metal or glass.  Those things will stop the signal dead in it’s tracks.

The good news is that you can get an Ethernet adapter for your Fire Stick.  It eliminates the whole issue of interrupted signals.

If you want to use a wire, check your device. Most inexpensive streamers like the FireTV products and Google Chromecast lack the Ethernet port required for a wired connection.  With this adapter you can solve that problem.  Most Smart TV’s these days come with an Ethernet connection as well.

 The Fire stick on mytv is “hard wired” using an ethernet adapter
http://bit.ly/fire-stick-adapter

my network speed is 150mbps http://bit.ly/wifiVSwired

4. Move stuff

I don’t mean your TV but moving your Wi-Fi router could help a lot. If it’s on or near the ground, in a closet, or at the far end of your house, you could be limiting the signal and speed without even realizing it. Wi-Fi can go through walls but being high up and with fewer walls between the router and streamer will help. If the router has antennas, positioning them correctly can also help.

The same is true on the other end. If you’ve got the streamer in a cabinet, that’s not helping either. In a perfect world, the streamer would have a direct line of sight with the router. This isn’t necessary, of course, but everything you place between the two of them decreases the signal and potentially lowers the speed.

An alternate version of this would be to get a Wi-Fi booster, or run Ethernet to a second Wi-Fi router. If your house is long or large, there are lots of options beyond the scope of this guide.

5. Kick the kids (off the Wi-Fi)

Think of your internet connection as a pipe full of water. There’s only so much water to go around. If you’re trying to stream in the living room, but the rest of the family is also trying to stream in other rooms, there might not be enough “water” to go around. Everyone will have issues.

Who gets priority in that case, I’ll leave up to you. No way I’m touching that one.

Test your results.  With each change you make, test again and see how it affected the signal.

Many streaming problems can be solved with these steps I’ve described. The key is getting the device the fastest internet possible, by any means necessary.

In selecting a replacement router consider a purchase that is upwards compatible with 5G technology.